Wood Fired Ovens! You’ve seen them at your favorite pizza place, you’ve seen them on TV, and all over the Internet and Pinterest. You simply MUST HAVE ONE and you want to build your own… Great! Now what? You might have the best kitchen gadgets in your kitchen and even a place to get started…

Wood Oven Diary….Catching up.
I haven’t been a very good blogger the last month or so, eh? I can tell you, it’s not because I’m laying on a couch made of Italian leather being feed peeled grapes and getting the royal treatment. But, just in case that visual crossed a few minds, here are some of the latest oven…
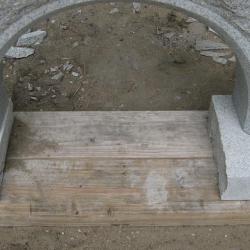
Wood Oven Diary….Carving The Outer Arch iii ( conclusion )
Just a real brief post to follow through on the completed arch, pedestal blocks and hearth. Today, my Dad and I are working on the framing for the roof. The blocks – after they were fabricated from rough granite. I placed them under the arch to check for fit before I trimmed them for real….
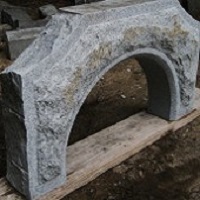
Wood Oven Diary….Carving The Outer Arch II
I had an unexpected turn of events, and not wanting to waste an opportunity, I was able to complete the granite arch today. Like the rest of this build, the arch is design as you go, and I was never sure exactly how I was going to carve this thing. I just let things happen,…

Wood Oven Diary….Carving The Outer Arch
I wanted to finish this piece before I posted about it, but I may not be able to work at it much the next few weeks. What I have here is going to be the outer arch. It is granite that came home with me after a trip to New England, and it will find…
Wood Oven Diary….Building the Dome!
So I need to catch up with the posting, we have lots going on, and with every spare moment going toward building, I find myself lagging behind with posts…a change of circumstances with this oven! Where was I…oh, right…the dome. After laying out the oven floor, I set up my soldier course and cut my…
Readers Choice II…..Tools I Use For Mortar Work.
O.K. First an apology to Sean, he asked for this a while back. I am confident he knows about every tool I am about to show, I think he just wants to see what I use on the job! Well Sean, here you go….a selection of what I use the most when I am working…
Wood Fired Oven Update…Insulation Slab
Things have been busy around here! I hope you are enjoying the new website..bear with me as I learn how to use the new features and don’t forget the discussion forum is coming soon! I know I promised a readers choice next, and I swear…next post will be! But I have been able to get…
Wood Oven Update….Structural Slab.
After the forms were placed and rebar tied, my next job was to make concrete for the structural slab. I made the concrete using a basic 3:2:1 mix by volume….3 parts stone, 2 parts sand and 1 part portland, I’d usually get help from companies like https://concrete-repair.co.uk/ but since this was a pretty small job…
Wood Fired Oven Update…..bond beam and structural slab prep.
So now that the dry stonework is done, the next step is turning the top course into a bond beam, to support the cast concrete pieces that will be set on top of it. My plan is to make two 3″ layers, the first overhanging the dry stone by 1 1/4″ or so, then the…
- « Previous Page
- 1
- 2
- 3
- 4
- …
- 6
- Next Page »